Saturday, December 31, 2011

The Engine Stand

My buddy Brian has been extremely accommodating on this restoration project – giving me advice and loaning me much needed tools. However, restoration projects are a contagious affliction and Brian must not have washed his hands the last time he came over. He is now rebuilding a TR6 and needs his engine stand. I am glad to return it - I just need to take off my truck engine first.
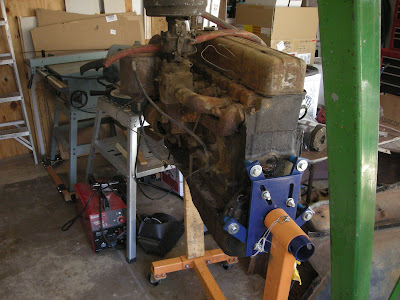
For those of you who have never had the pleasure of “pulling an engine”, once you remove it from the vehicle, you have to put it somewhere. That would be the engine stand. The engine stand looks like a bright orange hospital tray holder. You know, the kind with wheels where they roll it under your bed holding a tray of Salisbury steak and green congealed desert, and instead of the tray there is a huge ass engine connected to it.


After many months of working on the truck project, I am feeling my mechanic oats and am ready to tackle the task.– first you bolt the chains to the engine, then you jack up the engine lifter, next undo the engine from the engine stand, and then like a downy feather floating through the air, lower the engine to the floor. What could be easier?
“And now for the rest of the story” as the great radio personality Paul Harvey would say.
With all the confidence of first time firewalker I begin the removal process. Step one take off the valve cover, step two find three bolts that can be removed, step three attach the chains, and step four lift everything off the floor. This is like taking your first two steps on the bed of coals – so far so good, just don’t slow down.
Step five is where you separate the engine from the engine stand. Visualize the scene; the engine lifter is a huge green framework of metal arms and legs on wheels - somewhat resembling a praying mantis with chains hanging from its mouth. Hanging from these chains is a large blocky engine, its prey. And the engine is attached to a large orange hospital tray holder. Doctor Sherman is just about to perform the detachment procedure.


Enough with the imagery you mechanic wannabe, take the engine stand off already. I proceed to remove the bolts holding the two together. As I get the last one off – time stands still. With the weight of the engine stand removed, the five hundred pound engine moved into its new equilibrium position, which happened to be with the front pointing down at a forty-five degree angle.
Once the engine found its new happy place, it proceeded to dump about three gallons of antifreeze that had been hibernating in the engine for the past twenty years onto the floor. Time didn’t really stop, I did, I was frozen, all I could do was just watching this big red stream pour out of the engine. At my age I was in awe seeing a stream this big. There was a two inch high tsunami of antifreeze slowly engulfing my garage.
Finally it started to slow down and dribble out, this is when the spell was broken and I came back to reality - I knew how to handle a dribble. Well it took about thirty minutes to clean up the spill. All I could think of was scene from Carrie when they dropped the bucket of antifreeze on her.
Brian arrived after all the evidence was removed and we gently lowered the engine to the floor like a downy feather.
Thursday, December 22, 2011

Another Good Day

I have been working for months on the two front fenders and still have a ways to go. However I started on the front grill and Hot Damn I am on a roll. The grill was sanded and primed in ten minutes. Zip-a-Dee-Doo-Dah. Well since you asked, I employed the most advanced mechanic technique known to modern man - I bought the grill on ebay. After all my dolly dinging, grinding, welding, sanding, chemical reacting, wire brushing, rust inhibiting, and well you know - truck stuff, I decided that if I used the time money labor hypertension groin pulling algorithm it would converge on buying the part vs. fixing the old one. Stephanie has suggested that I try this method on a few other parts - something tells me my time is running out.
Not every second is dedicated to truck restoration, we had a small diversion this weekend, the Rudolph 5K Run came down our street. Sam and I wore Santa Claus hats to get into the spirit and Abby put on her reindeer outfit. I know dogs and I think she really likes it, I can see it in her eyes.


The other big success was to finish with the body filler stage on the fenders. Since I Zip-a-Dee-Doo-Dahed earlier, I will Yippee ki-ay now. Proper celebratory vernacular protocol must be followed, only one per essay. Once the body filler is sanded to the correct shape, the next step is to spray on the high build sanding primer. I can’t help but notice how similar auto body work is to the high fashion make up business. You know with buffing, foundation, filler, and color coat. Next year I am going to the New York fashion week as a body specialist. After all I have all the tools and a good eye for curves.
I have turned my garage into a salon of sorts, well a paint booth anyway. With the weather cooling down I have heated the garage and am able to spray parts. The fenders are primed and don’t you think it is a great shade of yellow.


The only problem with painting in your garage is the minor problem with overspray. I did shut my tool boxes and used a few drop cloths on my bench and table. But even with all the foresight and protection, sometimes a few items get painted in the fray. It is just a hazard of the trade.


I promis to be more careful in the future, although I would have preferred to paint the cat. Don't you think Abby looks good in a light citron.
My Oh My What a Wonderful Day.


Wednesday, December 7, 2011

A Good Day

 Over the last month I have been dinging on my dolly, daunted by the metal bumping and priming anything that doesn’t move. I have been waiting for a good day to give the next update. Today was the day – most excellent, if you know what I mean. I completed the whole front bumper assembly. That is I sanded it smooth and sprayed on the final coat of paint on the front bumper, bumper brackets, and bolts – semi-gloss black.  I am so proud of the front bumper that I am going to wrap it up in holiday gift paper and put it under the Christmas tree. I know if I am a good boy Santa might leave me a few other parts that I need.


One part down, nine thousand nine hundred and ninety-nine to go.
The next step of this never ending project is putting body filler on the panels – colloquially known as Bondo. Basically you really can’t ding out 100% of the dents on the body panels. To solve this problem, an Italian named Giuseppe Bondo figured out you could spread two day old Alfredo sauce on the metal panels to level everything out. When your Mom says “sticks to your ribs”, she means it. Once you get the body filler over the dents you just sand everything smooth and Voila all your body parts look like Murano glass.
Sounds easy enough, but I am here to tell you it is not as easy as it looks on the videos. Suffice to say I had some misfires and spent this Saturday crying in despair.  But as Scarlet says “After all... tomorrow is another day”. And after a miserable start working with the body filler, I finally got my groove going and I am sanding Bondo in a rapturous trance. Yes, yes, I know it is temporary; a false summit in hiking terms, but it is these little victories that keep us all going, Nine Thousand Nine Hundred and Ninety-eight steps to go.


Many of my colleagues have worked nights and weekends to get an MBA. This is an extraordinary individual accomplishment and gives them extra credentials to advance in their occupation. My truck restoration project is driving me in the same direction.  I find that I am working hard at nights and on weekends to get an MBA, too. However instead of going to Vanderbilt or Northwestern, I have taken the VoTech route to get the degree. If I work hard, in two years I will have my MBA – Master in Bondo Administration.
Stay tuned for more good news.