Saturday, December 31, 2011

The Engine Stand

My buddy Brian has been extremely accommodating on this restoration project – giving me advice and loaning me much needed tools. However, restoration projects are a contagious affliction and Brian must not have washed his hands the last time he came over. He is now rebuilding a TR6 and needs his engine stand. I am glad to return it - I just need to take off my truck engine first.
For those of you who have never had the pleasure of “pulling an engine”, once you remove it from the vehicle, you have to put it somewhere. That would be the engine stand. The engine stand looks like a bright orange hospital tray holder. You know, the kind with wheels where they roll it under your bed holding a tray of Salisbury steak and green congealed desert, and instead of the tray there is a huge ass engine connected to it.


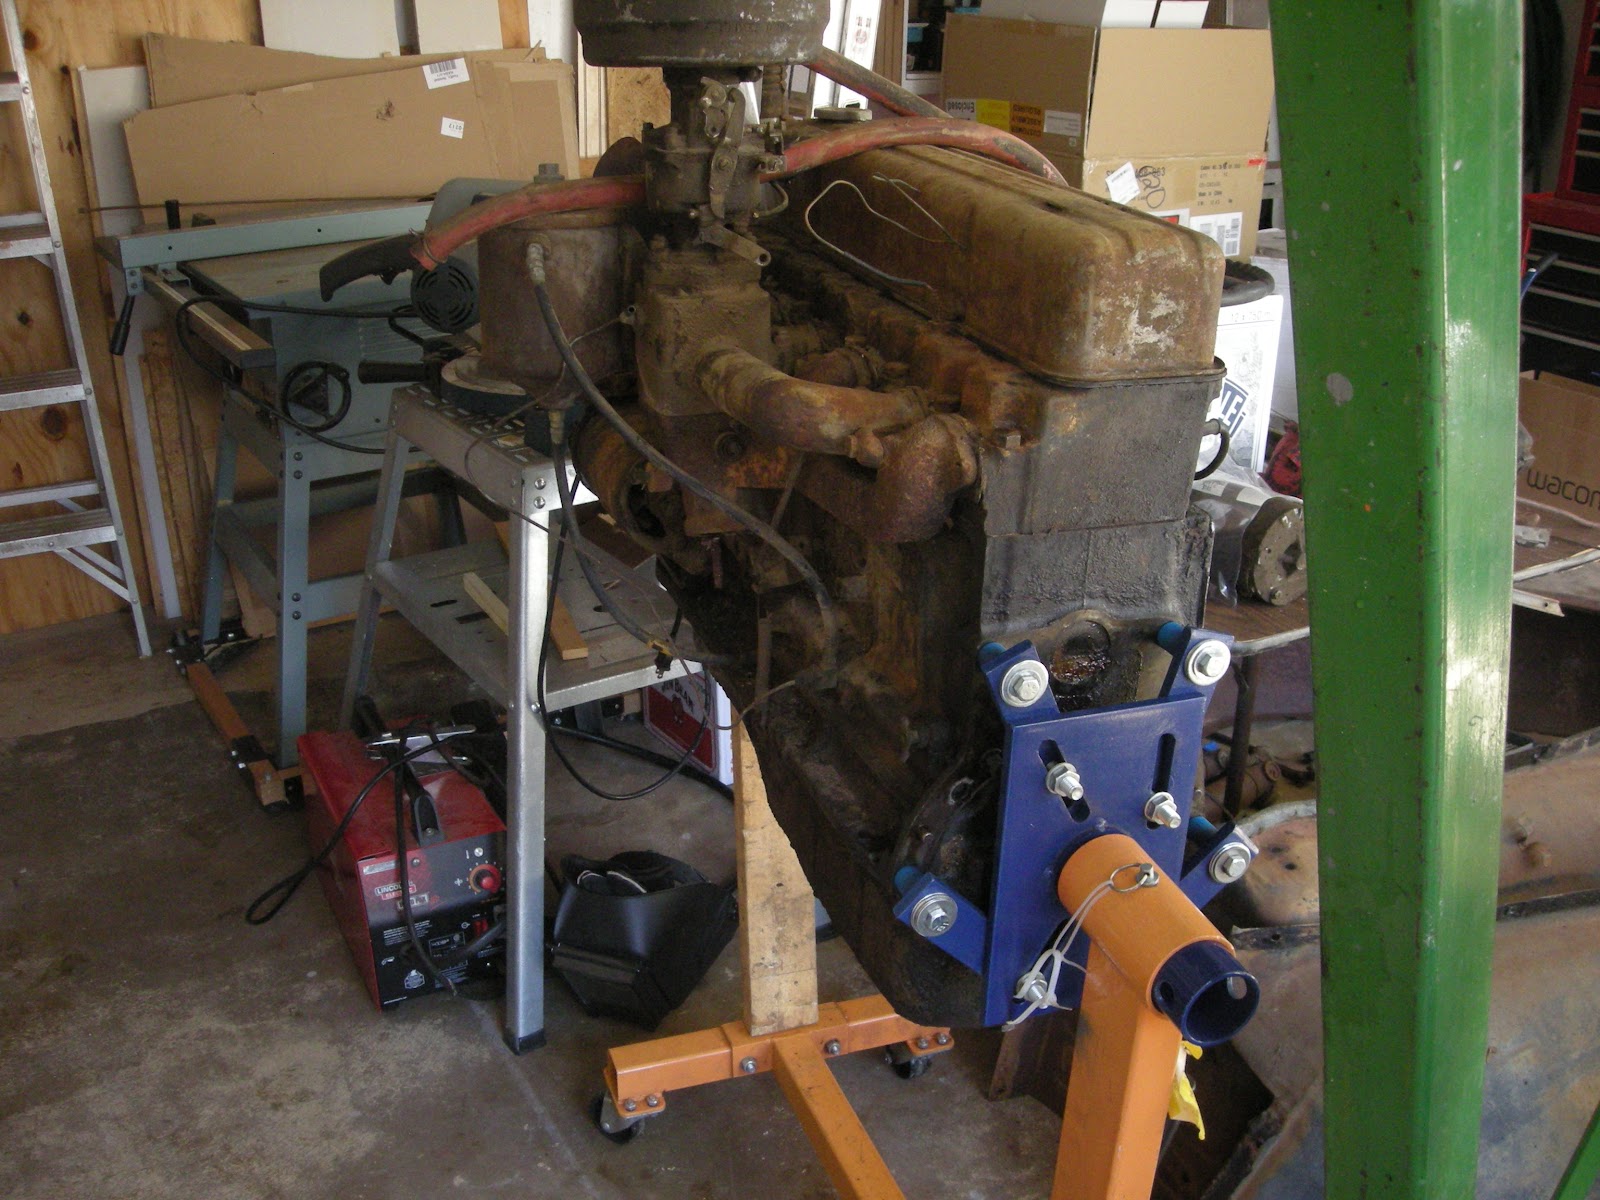
After many months of working on the truck project, I am feeling my mechanic oats and am ready to tackle the task.– first you bolt the chains to the engine, then you jack up the engine lifter, next undo the engine from the engine stand, and then like a downy feather floating through the air, lower the engine to the floor. What could be easier?
“And now for the rest of the story” as the great radio personality Paul Harvey would say.
With all the confidence of first time firewalker I begin the removal process. Step one take off the valve cover, step two find three bolts that can be removed, step three attach the chains, and step four lift everything off the floor. This is like taking your first two steps on the bed of coals – so far so good, just don’t slow down.
Step five is where you separate the engine from the engine stand. Visualize the scene; the engine lifter is a huge green framework of metal arms and legs on wheels - somewhat resembling a praying mantis with chains hanging from its mouth. Hanging from these chains is a large blocky engine, its prey. And the engine is attached to a large orange hospital tray holder. Doctor Sherman is just about to perform the detachment procedure.


Enough with the imagery you mechanic wannabe, take the engine stand off already. I proceed to remove the bolts holding the two together. As I get the last one off – time stands still. With the weight of the engine stand removed, the five hundred pound engine moved into its new equilibrium position, which happened to be with the front pointing down at a forty-five degree angle.
Once the engine found its new happy place, it proceeded to dump about three gallons of antifreeze that had been hibernating in the engine for the past twenty years onto the floor. Time didn’t really stop, I did, I was frozen, all I could do was just watching this big red stream pour out of the engine. At my age I was in awe seeing a stream this big. There was a two inch high tsunami of antifreeze slowly engulfing my garage.
Finally it started to slow down and dribble out, this is when the spell was broken and I came back to reality - I knew how to handle a dribble. Well it took about thirty minutes to clean up the spill. All I could think of was scene from Carrie when they dropped the bucket of antifreeze on her.
Brian arrived after all the evidence was removed and we gently lowered the engine to the floor like a downy feather.

Thursday, December 22, 2011

Another Good Day

I have been working for months on the two front fenders and still have a ways to go. However I started on the front grill and Hot Damn I am on a roll. The grill was sanded and primed in ten minutes. Zip-a-Dee-Doo-Dah. Well since you asked, I employed the most advanced mechanic technique known to modern man - I bought the grill on ebay. After all my dolly dinging, grinding, welding, sanding, chemical reacting, wire brushing, rust inhibiting, and well you know - truck stuff, I decided that if I used the time money labor hypertension groin pulling algorithm it would converge on buying the part vs. fixing the old one. Stephanie has suggested that I try this method on a few other parts - something tells me my time is running out.
Not every second is dedicated to truck restoration, we had a small diversion this weekend, the Rudolph 5K Run came down our street. Sam and I wore Santa Claus hats to get into the spirit and Abby put on her reindeer outfit. I know dogs and I think she really likes it, I can see it in her eyes.


The other big success was to finish with the body filler stage on the fenders. Since I Zip-a-Dee-Doo-Dahed earlier, I will Yippee ki-ay now. Proper celebratory vernacular protocol must be followed, only one per essay. Once the body filler is sanded to the correct shape, the next step is to spray on the high build sanding primer. I can’t help but notice how similar auto body work is to the high fashion make up business. You know with buffing, foundation, filler, and color coat. Next year I am going to the New York fashion week as a body specialist. After all I have all the tools and a good eye for curves.
I have turned my garage into a salon of sorts, well a paint booth anyway. With the weather cooling down I have heated the garage and am able to spray parts. The fenders are primed and don’t you think it is a great shade of yellow.


The only problem with painting in your garage is the minor problem with overspray. I did shut my tool boxes and used a few drop cloths on my bench and table. But even with all the foresight and protection, sometimes a few items get painted in the fray. It is just a hazard of the trade.


I promis to be more careful in the future, although I would have preferred to paint the cat. Don't you think Abby looks good in a light citron.
My Oh My What a Wonderful Day.


Wednesday, December 7, 2011

A Good Day

 Over the last month I have been dinging on my dolly, daunted by the metal bumping and priming anything that doesn’t move. I have been waiting for a good day to give the next update. Today was the day – most excellent, if you know what I mean. I completed the whole front bumper assembly. That is I sanded it smooth and sprayed on the final coat of paint on the front bumper, bumper brackets, and bolts – semi-gloss black.  I am so proud of the front bumper that I am going to wrap it up in holiday gift paper and put it under the Christmas tree. I know if I am a good boy Santa might leave me a few other parts that I need.


One part down, nine thousand nine hundred and ninety-nine to go.
The next step of this never ending project is putting body filler on the panels – colloquially known as Bondo. Basically you really can’t ding out 100% of the dents on the body panels. To solve this problem, an Italian named Giuseppe Bondo figured out you could spread two day old Alfredo sauce on the metal panels to level everything out. When your Mom says “sticks to your ribs”, she means it. Once you get the body filler over the dents you just sand everything smooth and Voila all your body parts look like Murano glass.
Sounds easy enough, but I am here to tell you it is not as easy as it looks on the videos. Suffice to say I had some misfires and spent this Saturday crying in despair.  But as Scarlet says “After all... tomorrow is another day”. And after a miserable start working with the body filler, I finally got my groove going and I am sanding Bondo in a rapturous trance. Yes, yes, I know it is temporary; a false summit in hiking terms, but it is these little victories that keep us all going, Nine Thousand Nine Hundred and Ninety-eight steps to go.


Many of my colleagues have worked nights and weekends to get an MBA. This is an extraordinary individual accomplishment and gives them extra credentials to advance in their occupation. My truck restoration project is driving me in the same direction.  I find that I am working hard at nights and on weekends to get an MBA, too. However instead of going to Vanderbilt or Northwestern, I have taken the VoTech route to get the degree. If I work hard, in two years I will have my MBA – Master in Bondo Administration.
Stay tuned for more good news.


Wednesday, November 16, 2011

Daunting

I find as I am working on the 54 Chevy truck restoration project, each stage of the process conjures up a name as if it was a campaign in a war, for example Desert Storm or Overlord. By now I was hoping I would be through the Baboon Phase, you remember, the one where you are out in the hot Alabama sun cleaning your parts, but I am resigned to the fact that this stage is more of a permanent affliction then a passing phase.
The current stage of the restoration is the body work. This entails preparing the body panels for painting and the name for this campaign is “Daunting”. It is not the individual fender or tailgate that defines the name but rather it is the sheer number of parts. No one could stop Attila the Hun’s Asian hoard.


I enjoy the English language for its richness and abundance of words available to convey a subtly meaning or idea. Miriam-Webster defines Daunting as: tending to overwhelm or intimidate as in, a daunting task. This is the perfect word for the body panel preparation stage. I freely admit to being intimidated by it all.
Each body panel in and of its self is manageable, albeit a boat load of work - between bumping out the dents, dinging on the dolly, removing the rust and priming the part, each one consumes more time than any sane person would allocate to project. But still, each one seems somehow manageable, within reach. It is the quantity that makes it daunting.

After working several weeks on the front fenders, they are mostly done, y’all know this is mechanic speak for – not really done. The dings are bumped out, the rust has been chemically blasted off or encapsulated and the fenders are even primed. However the one task that remains is to block sand each fender. This is where you put body filler on the body panels and sand to remove the imperfections. I call this the Oil of Olay technique and am thinking of starting a line of beauty products called ‘Le Daunted’.

The number of body parts in a 54 Chevy truck is close to the number of bones in a person’s foot – don’t bother to search for it on the internet, it is 26. There are the front fenders, the rear fenders, the bed sides, the doors, the running boards – for the record, there are two of each of these. Next are the bed front panel, the front splash apron, the hood, and the mother of all body parts – the cab. For the HGTV crowd, the cab is like the kitchen. When you are remodeling a house you spend 90% of your money and time on the kitchen. I am thinking the cab will have its own campaign name by the time I get through it.

The running boards and rear fenders were in such a sorry state that I executed a very advanced auto body technique – I ordered replacement parts. Then I donated the old parts to charity so I could get the tax deduction. I carry pictures of these new parts in my wallet so I can show my friends that I am in fact making progress.


Another trait I love about the English language is its continual evolution. If Webster is to Old School for you, Urban Dictionary will give you a more current definition of old words and new phrases. The rebranding of daunting is - Impressive or favorable, "cool," often modified by the addition of "mad" to indicate a great degree of these qualities.” To wit: “Dude, that 54 Chevy truck project is mad daunting.”

When I enlisted for this campaign I did sign up for a full tour of duty and yes learning how to repair the body panels is extremely daunting. But like the language the truck will evolve into one Mad Daunting Masterpiece.

Monday, October 31, 2011

The Metal Man

The only way I have any hope of completing this 54 Truck restoration before my sixteen year old daughter is a grandmother is to take it on as a series of small manageable projects and then complete them one at a time. A famous early Chinese mechanic, Lao-tzu, had a saying “A journey of a thousand miles begins with a single step”.  Only 9,950 more to go and the next step on this journey is the metal body work.
The truck I purchased was a working truck used by a rancher in Montana and truck has plenty of rust on the body parts. The good news is because of the dry climate, it did not rot out with rust like it would in Alabama. Since the truck was actually used by cowboy ranchers, the fenders definitely show the wear and tear – no bullet holes or spur marks, but plenty of dings, dents and for the advanced mechanic’s in the audience - boo boo’s.
Since I don’t know anything about body work, I did what all good managers do when challenged by ignorance – call a meeting with your advisory committee. Once convened, everyone gave the fenders a look and said; no problem, just bang it out, easy, take your time and my favorite “it will be fun”. You get what you pay for.
As I will be doing the work, it means that I have to learn the skill of metal bumping.  If I could just get a radioactive chipmunk to bite me, I could transform into Metal Man and repair fenders with my teeth. No such luck, we have two cats that keep the chipmunks in check. I am going to have to learn how to do it.
Being resourceful, I get on the internet and watch a few YouTube videos on how to repair fender dents. I even find the bible of Metal Men. This book was published in 1931 and apparently tells everything one needs to know about metal bumping. Fortunately Dale has the body shop tools, so I get started on the front fenders. Now I am not making this the up, I start by dinging on my dolly. Seriously, this is the proper technique - it’s in the bible. Basically you hold a dolly, which is a curved metal block, behind the fender and then hit the outside of the fender with a hammer to remove the dent.  It looks a lot easier in the videos, but I eventually get the hang of it and start to ding out the dents.


You need to put your kids to bed for this part – the advanced metal bumping method is to “ding off your dolly”.  Believe me this in not for the faint of heart and a technique that is hard to master.  Although the front fenders were actually in good shape, for the last four weeks I have been busy in my back yard dinging on and off my dolly, sanding, grinding, and using chemicals to etch, dissolve and encapsulate the rust. I am expecting a call any day now from the EPA.


All this is more than a little overwhelming, so given the sorry condition of the rear fenders, you remember – the boo boos, I opted for the modern body shop technique which is to buy new ones. While it will take 6 weeks for the fenders to get here from who knows where, it will save me two months on the project and my sanity.


This body work is very mundane and tedious so I am developing a Zen attitude about the whole process. I can’t wait to take the next step.

Sunday, September 25, 2011

Mamma’s In the House

You knew it would happen, it was only a matter of time.
I love my wife of 31 years, she has the most gittyup-and-go of anyone I know, even Dale. She has patiently let me fumble through the truck project and even provided motherly support like one would to an eight year old building his first pine box derby car. But at some point she had to step in.
Well I was out of town with my daughter last week, this is another twilight zone story, and Stephanie said she would sand the fenders over the weekend. Just for those of you that play hockey, there are four fenders, not three.  She was going to sand all of them - okay this could be good.
I gave her a little advice before I left for Memphis and Dale was going to drop by for the final check out. Saturday afternoon I got a call and was told that the sander had completed its final orbit and burned up during reentry. Being resourceful, Stephanie went to Harbor Freight, she still talks about how much fun she had going there, and buying a new sander, a multitude of sanding disks and a whole lot of new friends.


I had told her that Dale being a Power aficionado used the large air fittings because you just can’t get to much air. To her credit she did put on the big adapter, I guess she was just use to working with big fittings, however she was having trouble getting the sander connected to the air hose. I walked her through the process and she successfully got it connected. The next problem was that air was leaking from the fitting.  I asked if she put the Teflon tape on the threads and the line went dead.  Okay, she is fine, I told her what to do and voila, the tape was on, the sander connected, and she was SANDING her pee- picking fingers off.


Bless her heart she used the Moses technique and sanded for three days and three nights and got the outsides of all four fenders in tip-top shape.
What could be better.


Next, Dale and I went to work on the front inside fender skirts. We grinded and sanded and chemically treated them until they were perfect.  I have to admit I had a bit of a crisis with the final prep. We used Eastwood Fast Etch for the rust treatment, it is excellent. But it did leave a gooey residue in some places. I tried acetone, lacquer thinner, engine degreaser, and Limco final prep. It turns out that sanding and a final lacquer thinner wipe did the deed but I was really concerned about the primer sticking to the goo.  Well time will tell.


We put on several coats of acid etching primer and man do the skirts look hot.


Well it looks like I am still in the Baboon phase but let me tell you I can see the light at the end of the long tunnel. I just need to keep my wife working on the fenders and hope she doesn’t try to polish my nuts.


Tuesday, September 13, 2011

It Is All About Clearance

The new meat on the ol’ 54 is awesome, I mean what eighteen year old doesn’t love chrome spoke wheels and eight inch tires. I know I do.
After the tires were mounted on the wheels, the next step was to put the wheels on the front wheel hubs to see how they fit. The chrome eight inch rim slips on over the brake drum just like it was meant to be, but then I discover a problem. The front tie rod ends rub against the rims. This is not good, no clearance.


Now I begin to understand the meaning of “Clearance” and how non-stock parts could have unintended consequences. Well the parts store where I bought the rims were not interested in a return or anything of that ilk, however they were glad to sell me a ¼ inch spacer that goes between the wheel and the wheel hub. This spacer will move the wheel away from the tie rod end. Next, I put two washers between the steering knuckle and the steering linkage arm, this moved the wheel out another ¼ of an inch.


Can you see the difference?
I wanted a second opinion on my “engineering” modifications and once again ask Richard Pella to come over and assess the situation. He gave me a clean bill of health on the use of the washers and the spacer, but asked if I had checked the clearance of the tire inside the wheel well.  Well now that you bring it up, it seems like an obvious thing to consider, except that of course I hadn’t even thought about it.  Remember the eighteen year old kid, nothing could be better than 8 inch meats, what do you mean it has to fit in the wheel wells.
Okay so I put on the inner fender skirt, reattach the front fender, and much to my relief everything fits. Yo, I got Clearance to spare.


It took a few extra steps, but all-in-all another happy ending.
What could be better.

Friday, September 2, 2011

It’s Never Over

It is that time of the year in Alabama were we have the hot muggy days and the temperature is in the high nineties. It makes you think you are on the African Savannah. Still, there is nothing much better than working in the man cave on the truck project.
Dr. Dale was out on rounds last week and came by to check up on the truck. I have to admire his commitment to the project.  I was pretty proud about the amount of parts already assembled; brake drums, drive shaft, bell housing and steering components. Well Dr. Dale was not really happy with the rusty brake drums and rusty drive shaft, clearly it was not acceptable. The next thing I knew I had a prescription to paint my parts.


Like any patient that doesn’t like the diagnosis, I wanted a second opinion. I pleaded my case to Dr. Brian, my other mechanic friend, and to my great surprise; he too said I had to paint all my parts. It’s a conspiracy. Why, I asked?  Now this is the true story, he explained that if I just happened to stop the truck over a mirror, people would be able to look up at my trucks private parts and it was just not lady like to not have them painted.  Remember what your mother said about always wearing clean underwear, you just never know who will see yours. At this point I figured I had enough opinions and went to the paint store.
Thinking of the Queen, I dedicated the weekend to cleaning my parts. First the wire brush, next the Purple Power degreaser, which was followed by brake cleaner.  My team of advisors said that Barbeque paint was the best paint option because it would stick to the rust and handle the heat from the braking action.  I have to admit that the parts do look good. But you all know I am a sucker for those little black numbers.


While my Hillbilly garage has its good points, it does not really keep all the moisture off the truck.  This fact comes to my attention as I am working on the brake drums and notice that rust is coming through the paint and in fact the spot where I was working, the Barbeque paint was rubbed off. Lord Jesus Mother of Mary, all my hard work for naught.
My theory is that there was still a grease residue on the parts and that prevented the paint from properly bonding. Now I have exactly what my Mother feared, holes in my underwear.
And it is not over, I still keep finding dirty rusty parts that need cleaning. The bed parts, among others need to be prepped. It will be a long summer.


I am going to be so glad when the Baboon Phase of this project is over. You know, the phase where you sit around on the hot savannah cleaning your parts.

Monday, August 29, 2011

Meat for the ¾ Ton Truck

There is nothing like small town neighborhood customer service.  Jacob from the Goodyear shop came by last Saturday to help me determine the correct tire size for my special needs truck. These lifelines are really saving my bacon. After analyzing the partially assembled truck he recommended a 245/70R16.  I told him I was secretly hoping he would say that because it was the combination of my high school locker.
I dropped the rims off and they ordered the tires. As fate would have it I was out of town on a business trip when the wheels were ready to be picked up. My gracious wife took the Prius to the shop to pick up four huge tires and the guys in the shop loaded up the car. If they tied Granny Clampett to the roof it would have been perfect. When Stephanie was unloading the tires, she let one roll off the back of the car. Well that tire hit the pavement and since it was full of flubber, it bounced up and smacked her in the face. She is okay and the tread marks go well with the missing tooth.
I got new meat and this little 54 Truck is ready for some hauling. Did he just say “meat”? Most definitely, meat is a term I learned as a kid in Colorado and is slang for tires, mostly used in drag racing. I double dare you to Google it.


I really can see the potential in this project and am ready to hit the road.


Of course there is still lots of work left to get the cab in shape.


Monday, August 22, 2011

Wild Weather

We have had our share of bad weather in Alabama this year, killer tornados, wind storms, and our regular punishing storm fronts. All in all, downtown has survived and avoided major damage, well mostly.
A storm front came through the other day while I was at work. Hey no big deal, we get these every week. However, when I got home I found that my Hillbilly garage was demolished. I am sure some neighbors would have been glad for it to have been blown all the way to Kansas.


Oh well, at least with my camouflage tarp I can use what’s left as duck blind. I think the Northern Truck Duck is in season.
Now y’all remember how pretty it was before, it was so nice we even had parties on the truck frame. Everybody has a little red neck in them.


I did have a spare tarp and surprisingly was able to resurrect the shade tree garage in a few days. That is one mighty fine truck you have there Mr. Sherman.


This is Hillbilly Heaven, what could be better.

Monday, August 15, 2011

What A Day

The frame is mostly done; the suspension, brakes, drive shaft, and transmission are all installed. Next is to get the tires and put this baby on the road. In order to select the correct tire size, believe me there are a zillion, we need to do a test fitting of the body on the frame so we get the tires sized correctly.
You ladies will understand this, one has to put on the dress to pick out just the right shoes – do I get the strappy Jimmy Choo’s, the sassy Candies, or maybe the little black Goodyears.
Step one of the test fit is to install the cab, remember this is not an ordinary cab. It is a Five Window Cab, baby. We use an advanced body shop technique to put the cab on the frame, the Egyptian litter-bearer method. I rounded up the Lowry men and with Dale we made four. Using two 2x4 boards we picked up the cab and dropped it in place.


It is hard to believe but It took only four bolts to attach the cab to the frame. Next, Dale and I attached the front and rear passenger side fenders and the result was unbelievable. Anubis, Ra, and Osiris were surely smiling on us. After ten months of working on the frame, the truck came to life, just look at the pictures.


Now we can select the proper tires. The key is to get a tire that is proportional to the wheel well and fenders.  I am thinking of a little black number.
Well as good as it looks, sadly it is just a test fit. Dorothy don’t look behind the curtain you might get some oil spots on those Ruby Red Slippers.


Thursday, August 11, 2011

The Rear End is Near

With the rear springs installed, thank you very much, the next part is the rear end. As you can see in the before picture below, this is one big rear end, I am talking J.Lo size baby.


The challenge is how to get the 400 pound rear end under the frame and into position. I have my “professional” reinforced dolly, my old man back support – just like they wear at The Home Depot, a hydraulic jack, many blocks of wood, and Preparation-H. All and all it worked out pretty well. With a few ups and downs, I got the rear end positioned properly and installed the U-bolts.
Okay, it wasn’t quite that simple, I first had to go through the spacer conundrum. It turns out GM used the same rear shackle for many models. The way they did this was to use a spacer to accommodate the different spring sizes. The conundrum is – which side does the spacer go – Port or Starboard? Let me translate the nautical analogy, the right way or the wrong way. The 1954 Truck Shop Manual which uses bold italics for important instructions stated that the spacers were on the inside of the shackle. Now for the hyperspace discontinuity, the 1954 Factory Assembly Manual shows the spacers on the outside of the shackle. She loves me, she loves me not, she loves me…. Well I went with the Shop Manual instructions because I am a sucker for italics.


You got it, they go on the Port side matey. So once again I get to take it apart, move the spacers, and reinstall the springs. Belisima perfecto!
Yeah the rear end is on.  In celebration I turn the u-joint pinion shaft a few times just to see the wheels turn, well it just seems like too much play.  I mean I can turn it a mile and it seems to make a lot of noise. Brimmer is learning to listen to the little voices in his head - something is not right. So I use a life line and walk over to the Goodyear shop and ask them if they work on rear ends, my hope is a mechanic will come over to take a look. But no, they don’t work on them.  Now I am desperate, I use a mobile shout out and call Richard, he is gracious enough to come over and take a look at my rear end.  After he looked at the backlash, tolerance stack, reverb, and general wobbliness, he said the rear end was tougher than me and there was really nothing I could do to break it. He gave me a clean bill of health and the rear end is in!


Next were the rear shock absorbers and it’s always something.  The bolt that holds the shock to the bottom hanger is 5/8 inch. That’s right and the hole in the hanger is 5/16 inch.  Something ain’t right. Well I can make the hole bigger or get smaller bolts.  Since they don’t sell the huge ass drill bits at The Home Depot, I opted for the smaller bolts, which to my surprise they had in stock.
With the rear shocks installed, all I had left was to install the last section of the drive shaft.  This went on without any problems.  Now I am nervous, because that means I did it wrong. The picture shows the fruits of my labor.
The old 1954 Chevy Truck has some serious booty.


The before picture shows how much progress was made.


Sunday, August 7, 2011

Rear Leaf Springs

The big day has finally arrived; the rear leaf springs from Posies are mostly done. I received and email stating that the springs were just about finished and that they would be shipped in a week. When they shipped, the UPS tracker showed that they spent a few days in Atlanta; I sure hope they picked up some of my favorite Sweetwater IPA.


Orlando, the UPS person dropped the springs off and even put them in the back yard for my wife. Of course this was after he checked to be sure the dog was inside. The other day he dropped off a small package, but since our dog Abby was on the porch, he just stood by the truck, holding the package out from his arm. My wife had to walk across the street to get the package. I would probably be cautious of dogs if I was the UPS person, too.


I did a quick test installation of the springs and they fit perfectly, well mostly!
With all the delays, Posies did not charge me for the U-bolts and bushings. That was nice of them, but they shipped the wrong size U-bolts which meant that I would have to cut them to the correct size. Well that is nothing for an Ace Mechanic. These U-bolts looked like they were two feet long, oh well; it takes the same effort to cut off an inch as it does to cut off a foot. Just ask Lorena Bobbitt.
On to the next problem, my bushings are too small.…  Below are the rear shackle, the shackle bolt, and two too short bushings. Billy Mays must be just around the corner. Anyway, Posies agreed the bushing were the wrong size and sent the larger ones, much to Stephanie’s delight. My friends at R&R Speed Shop pressed the bushing into the shackle and man it doesn’t get any better than that.


The spring installation was easy, hang the shackle, insert the shackle bolt through the spring eyes, and stand back to see the good news. Just look at the before and after pictures, progress baby! Next up is the rear end and brake lines.
Happy Day